[번역] SWT Programming with Eclipse 그거/Java2008. 11. 10. 21:55
SWT Programming with Eclipse
2. SWT application 만들기 ................... 3
3. Eclipse에서 SWT 개발 환경 설정하기.... 5
4. 첫번째 SWT application 실행하기 ......12
5. Eclipse 없이 실행하기 .......................13
6. SWT package .................................14
7. Dialogs ..........................................15
8. Widgets .........................................18
9. 결론 ...............................................32
# 원본
DOCUMENTATION BY DEVELOPER.COM (http://www.developer.com)
SWT Programming with Eclipse By Koray Guclu
swt-guide.pdf
이 문서는 SWT를 처음 공부하는 사람에게
어렵지 않은 예제와 이미지를 통해 SWT에 쉽게 다가갈 수 있는 좋은 문서라 생각되어 번역을 했습니다.
혼자 공부하면서 정리한 문서라서 오역 오타가 있을 수 있습니다.
2008-11-10 최유복
1. 왜 SWT 인가?
왜 IBM은 기존의 Java GUI Framework을 사용하지 않고 cross platform GUI 인 SWT(Standard Widget Toolkit)를 개발했을까?
Sun 은 cross platform GUI인 AWT(Abstract Window Toolkit)을 개발했으나,
AWT는 native widget을 사용했으나, LCD에 문제가 있었는데, platform A에 widget이 1부터 40까지 있다고 하고, platform B에 widget이 20부터 25까지 있다고 할 경우, AWT는 platform A와 platform B 의 교집합인 20부터 25까지의 widget만을 제공할 수 있었다.
이 문제를 해결하기 위해 Sun 에서는 native widget 대신에 에뮬레이트된 widget을 사용하는 Swing 이라고 불리는 새로운 framework을 개발했으나, 이 framework은 LCD 문제는 해결이 됐으나, GUI가 더 이상 native application 처럼 보이지 않는 또 다른 문제점이 발생했다.
게다가, Swing application은 메모리도 많이 사용하고, PDA나 휴대전화 같은 작은 device에는 적합하지 않았다.
이에 IBM은 그들의 요구사항을 충족하고, AWT/Swing application 에서의 문제점을 해결할 수 있는 SWT라 불리는 새로운 GUI library를 개발하게 됐다. SWT는 JNI를 통해서 native widget을 접근한다.
2. SWT application 만들기
SWT application을 만드는데 Display, Shell, Widgets 클래스들은 기본적인 클래스이다.
Display 클래스는 event loop과 UI thread와 다른 thread 사이의 통신을 관리한다.
Shell 클래스는 application에서 OS window manager에 의해 관리되는 window 이다.
모든 SWT application 들은 적어도 하나의 Display, 하나 이상의 Shell instance를 이용해서 개발된다.
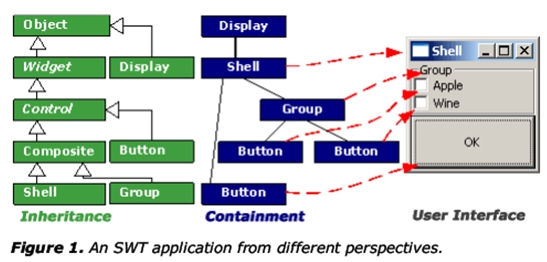
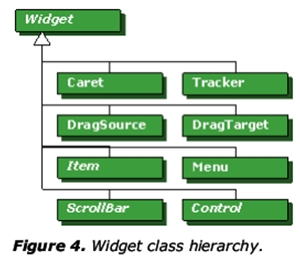
Figure 1 은 세가지 다른 관점에서 SWT application을 보여준다.
첫번째 다이어그램은 UI object 들의 상속 관계를 보여주고,
두번째 다이어그램은 UI object 들의 연결 관계를 보여주고,
세번째 다이어그램은 실제 만들어진 UI를 보여준다.
application이 다중 thread를 사용할 경우 각 thread는 각자의 Display object의 instance를 사용하며, Display.getCurrent() method를 호출하면 현재 활성화된 Display object의 instance를 얻을 수 있다.
Shell 클래스는 특정 O/S에서의 window를 나타낸다.
Shell은 최대화/보통/최소화 등을 할 수 있으며, 두가지 타입의 shell이 존재한다.
첫번째는 Display의 메인 window로서 child로 생성된 최상위 레벨 shell 이며,
두번째는 다른 shell과 관련있는 dialog shell 이다.
Shell의 모양은 Shell 클래스의 생성자로 전달되는 변수에 의해 좌우된다.
Shell은 기본으로 dialog shell 이며, 생성자의 변수로써 Display object가 전달되면 최상위 레벨 shell이 된다.
몇몇 widget 속성들은 생성되는 시점에 설정이 되어야 하는데, 이를 style bits라고 부른다.
style bits 들은 SWT class의 상수로 정의되어 있으며 다음과 같이 사용된다.
Button button = new Button( shell, <style bits> );
| ( OR) 연산자를 사용하여, 하나 이상의 style bit을 사용할 수 있으며,
테두리가 있는 버튼을 생성하고 싶을 경우 style bit을 "SWT.PUSH | SWT.BORDER" 과 같은 식으로 줄 수 있다.
3. Eclipse에서 SWT 개발 환경 설정하기
SWT application을 개발하는 것은 Swing application을 개발하는 것과 다르며,
CLASSPATH에 SWT library를 추가해야 하고, 환경 변수를 설정해야 한다.
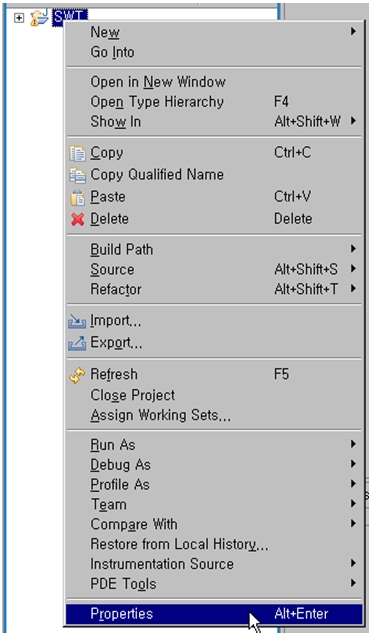
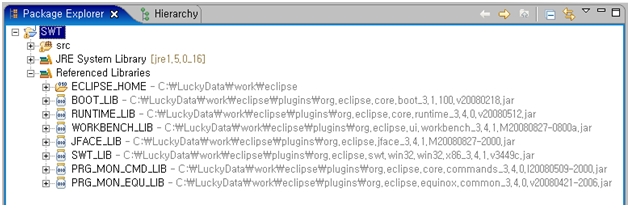
SWT library중에 ECLIPSE_HOME\eclipse\plugins\ 밑에 있는 swt.jar 파일이 첫번째로 필요하며, 이 파일을 CLASSPATH에 설정하기 위해 아래와 같은 절차를 따른다.
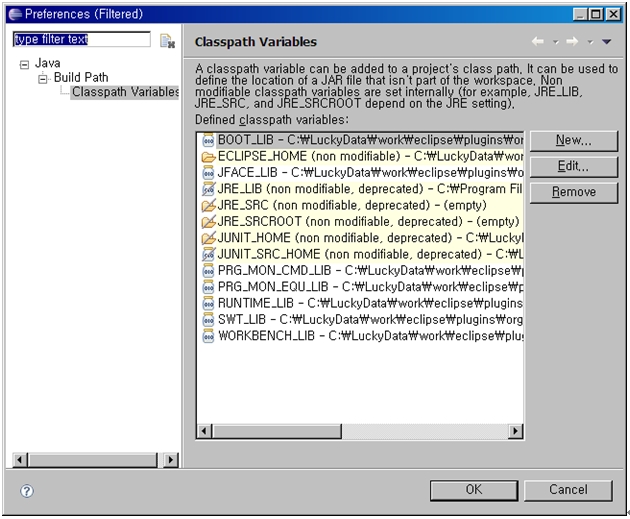
Project -> Properties -> Java Build Path -> Libaraies -> Add Variable -> Configure Variables -> New
위 순서를 따라 아래의 7가지 jar 파일을 추가한다.
C 아래의 내용은 원본에는 없으며, 필자가 작업하여 추가한 사항이다.
Name : BOOT_lIB
Path : org.eclipse.core.boot_xxxx.jar
Name : JFACE_LIB
Path : org.eclipse.jface_xxxx.jar
Name : PRG_MON_CMD_LIB
Path : org.eclipse.core.commands_xxxx.jar
Name : PRG_MON_EQU_LIB
Path : org.eclipse.equinox.common_xxxx.jar
Name : RUNTIME_LIB
Path : org.eclipse.core.runtime_xxxx.jar
Name : SWT_LIB
Path : org.eclipse.swt.win32.win32.x86_xxxx.jar
Name : WORKBENCH_LIB
Path : org.eclipse.ui.workbench_xxxx.jar
Project -> Properties
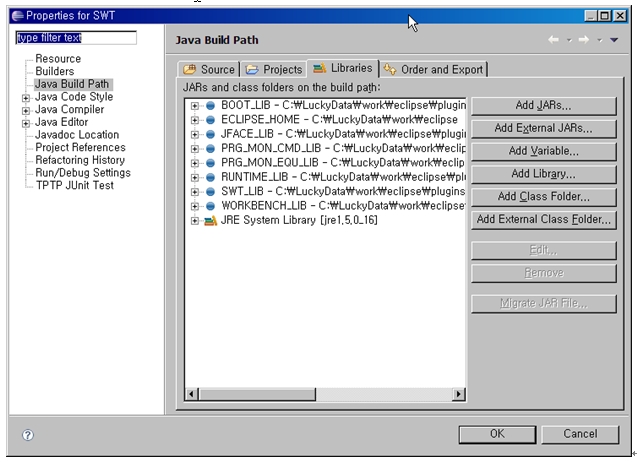
Properties -> Java Build Path -> Libraries
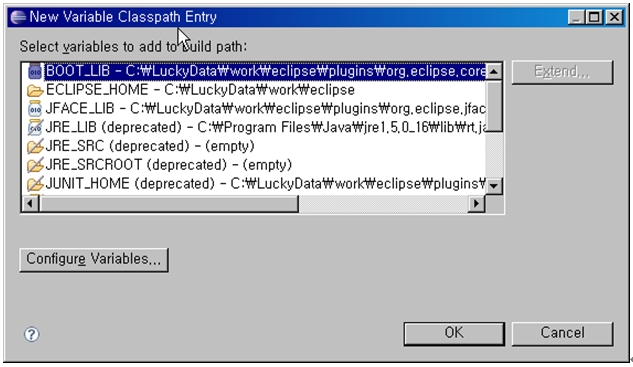
Libraries -> Add Variable
Add Variable -> Configure Variables
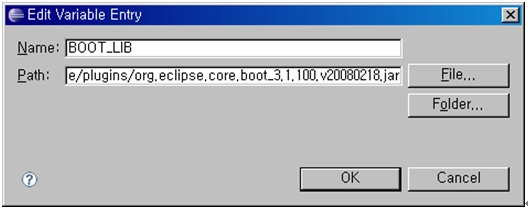
Configure Variables -> New (BOOT_LIB)
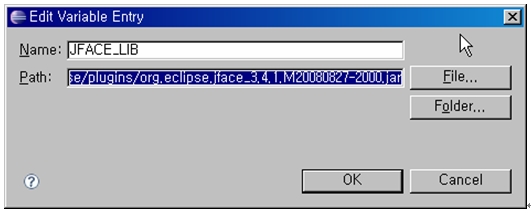
Configure Variables -> New (JFACE_LIB)
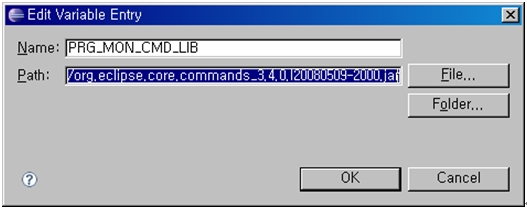
Configure Variables -> New (PRG_MON_CMD_LIB)
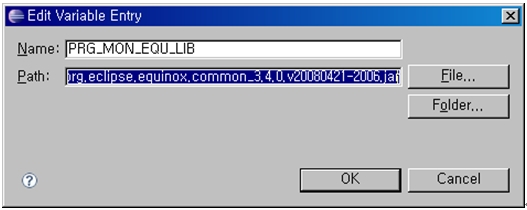
Configure Variables -> New (PRG_MON_EQU_LIB)
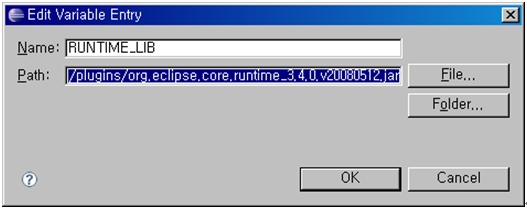
Configure Variables -> New (RUNTIME_LIB)
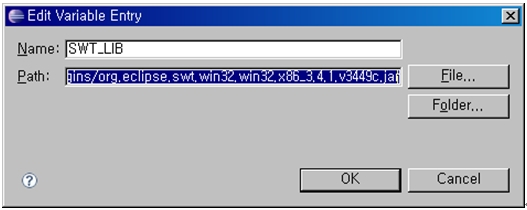
Configure Variables -> New (SWT_LIB)
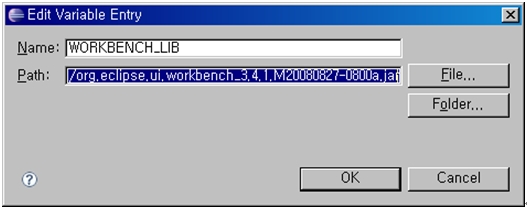
Configure Variables -> New (WORKBENCH_LIB)
위에서 언급한 library를 모두 추가한 후에 package explorer를 보면 아래와 같이 추가한 library들을 볼 수 있다.
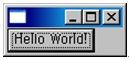
4. 첫번째 SWT application 실행하기
이제 모든 설정은 끝났으며, 아래 소스 코드를 이용하여 간단한 테스트 프로그램을 실행해볼 수 있다.
package swt.ch01;
import org.eclipse.swt.*;
import org.eclipse.swt.widgets.*;
public class HelloWorld {
public static void main (String [] args) {
Display display = new Display();
Shell shell = new Shell(display);
Text helloText = new Text(shell, SWT.CENTER);
helloText.setText("Hello World!");
helloText.pack();
shell.pack();
shell.open();
while (!shell.isDisposed()) {
if (!display.readAndDispatch())
display.sleep();
}
display.dispose();
}
}
위 소스코드를 실행하면 다음과 같은 결과를 얻을 수 있다.
5. Eclipse 없이 실행하기
Eclipse가 없는 상황에서 SWT application을 실행해야 한다면, swt.jar 파일이 반드시 CLASSPATH에 포함되어 있어야 하며, java.library.path 환경변수가 설정되어 있어야 한다.
Host platform 일 경우에는 native library를 사용할 수 있는 환경이 되나, MS Window platform 에서는 아래와 같이 하여 실행할 수 있다.
1. swt.dll 파일을 실행할 SWT application과 같은 위치(예를 들어 c:\swt)에 놓는다.
2. swt.dll 파일을 JAVA_HOME/bin 밑에 놓는다.
3. swt.dll 파일을 c:\windows\system32 밑에 놓는다.
4. javac –classpath c:\swt\swt.jar HelloWorld.java
5. java –classpath c:\swt\swt.jar –Djava.library.path=c:\swt HelloWorld
C 사실 위의 환경에서 해보지 않았기 때문에 위 내용이 맞는지는 알 수 없다.
6. SWT package
SWT는 아래의 main package로 구성되어 있다.
org.eclipse.swt : SWT class 들에서 사용되는 상수와 exception 들을 포함하고 있다.(SWT, SWTException, SWTError class 로 구성됨)
org.eclipse.swt.widgets : 대부분의 core SWT widget 콤포넌트들이 포함되어 있다.
org.eclipse.swt.events : SWT 콤포넌트들이 사용하는 event들에 대해 정의되어 있으며, Listene interface들, Adapter class들, Event class로 구성되어 있다.
org.eclipse.swt.dnd : drag-and-drop을 지원하는 SWT widget들을 포함하고 있다.
org.eclipse.swt.layout : SWT widget의 위치와 크기를 조절하는 class들을 포함하고 있다.
org.eclipse.swt.print : SWT widgets에서의 print 기능을 제공하는 class들을 포함하고 있다.
org.exlipse.swt.graphics : 점, 사각형, 구역, 색, 커서, 폰트, graphics contexts 등의 동장에 대해 구현되어 있으며, image를 불러오고 저장하는 API도 포함하고 있다.
7. Dialogs
Dialog는 native UI를 구현한 것들이다. 즉, platform 콤포넌트들인 것이다.
SWT에서 Dialog 들은 Dialog 추상 클래시로부터 구현됐다.
Dialog는 widget은 아니지만 다른 widget들을 포함하고 있다.
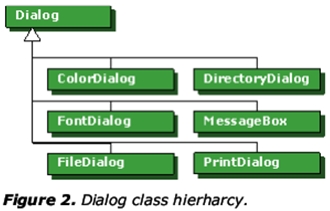
사용가능한 dialog에는 몇가지가 있는데, 일부 dialog 들은 특정 속성을 가질 수 있다.
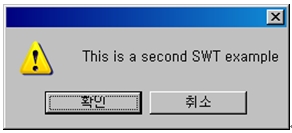
아래는 문자열을 출력하고 OK 버튼, CANCEL 버튼, 경고 아이콘을 을 포함한 dialog의 소스이다.
MessageBox messageBox = new MessageBox(shell, SWT.OK | SWT.CANCEL | SWT.ICON_WARNING);
messageBox.setMessage("This is a second SWT example");
if( messageBox.open() == SWT.OK ) {
System.out.println("OK is pressed");
}
위 소스를 실행하면 아래와 같은 결과를 얻을 수 있다.
각 dialog의 open() 메소드는 다른 유형을 반환하는데,
MessageBox dialog는 open() 메소드를 호출하면 int 를 반환한다.
따라서, 각 dialog들에 대해서 반환값을 처리하려면 각각 다르게 처리해야 한다.
ColorDialog는 색상을 선택할 수 있도록 해주는데, 반환 메소드에서 RGB object를 반환한다.
DirectoryDialog는 디렉토리를 선택할 수 있게 해주는데, open() 메소드를 호출하면 선택한 디렉토리인 String object를 반환한다.
FontDialog는 system에 설치되어 있는 사용 가능한 font들을 선택할 수 있게 해주는데, open() 메소드를 호출하면 FontData object를 반환한다.
FileDialog는 파일을 선택할 수 있게 해주는데, 확장자 filter, 경로 filter, 파일명 filter 들을 설정할 수 있다.
이 dialog는 SWT.OPEN, SWT.SAVE 같은 style bit을 갖고 있다.
PrintDialog는 인쇄 작업을 시작하기 전에 프린터를 선택할 수 있게 해주는데, open() 메소드를 호출하면 PrinterData object를 반환한다.
MessageBox dialog는 사용자로부터의 feedback을 받기 위해 사용하는데, | (OR) 연산자를 사용해서 다른 style bit을 섞어 사용할 수 있다.
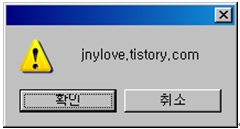
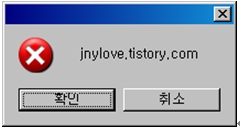
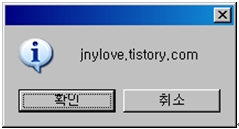
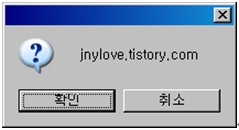
아래는 SWT.ICON_ERROR, SWT.ICON_INFORMATION, SWT.ICON_QUESTION, SWT.ICON_WARNING, SWT.ICON_WORKING style bit을 이용하여 각각 다른 icon을 갖는 MessageBox 를 생성한 예제를 보여주고 있다.
|
MessageBox messageBox = new MessageBox(shell, SWT.OK| SWT.CANCEL| SWT.ICON_WARNING); messageBox.setMessage("jnylove.tistory.com"); messageBox.open(); |
|
|
MessageBox messageBox = new MessageBox(shell, SWT.OK| SWT.CANCEL| SWT.ICON_ERROR); messageBox.setMessage("jnylove.tistory.com"); messageBox.open(); |
|
|
MessageBox messageBox = new MessageBox(shell, SWT.OK| SWT.CANCEL| SWT.ICON_ERROR); messageBox.setMessage("jnylove.tistory.com"); messageBox.open(); |
|
|
MessageBox messageBox = new MessageBox(shell, SWT.OK| SWT.CANCEL| SWT.ICON_ERROR); messageBox.setMessage("jnylove.tistory.com"); messageBox.open(); |
|
|
MessageBox messageBox = new MessageBox(shell, SWT.OK| SWT.CANCEL| SWT.ICON_ERROR); messageBox.setMessage("jnylove.tistory.com"); messageBox.open(); |
|

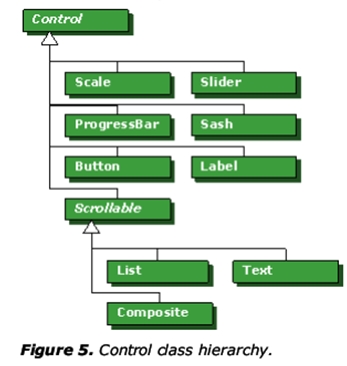
8. Widgets
SWT GUI object들은 Widget, Control 클래스로부터 생성이 되는데, Widget object는 모든 GUI class들에 대해서 기본적인 class 이며, method 들을 정의하고 있다.
Control class는 모든 window GUI 클래스들의 기본 클래스이며, Control class로부터 생성되는 콤포넌트들은 화면에 보여주기 위해서는 window 또는 dialog가 필요하다.
Widget, ScrollBar, Control class는 추상 클래스이다.
Widget Event들은 아래 표에 정리되어 있다.
아래 표에서 각 EventName에 대해서 Listener, Adapter, Event class는
<EventName>Lister, <EventName>Adapter, <EventName>Event 와 같은 식으로 확인할 수 있다. 단, Adapter가 있는 EventName에 대해서는 bold 처리된 EventName 들만 해당된다.
예를 들면, EventName이 Control일 경우 Lister는 ControlListener, Adapter는 ControlAdapter, Event는 ControlEvent 이다.
|
Event Name |
Widgets |
Generated Item |
|
Arm |
MenuItem |
Menu item이 활성화 되었을 때 |
|
Control |
Control, TableColumn, Tracker |
Control의 크기가 변경됐거나 이동됐을 때 |
|
Dispose |
Widget |
Widget이 죽을 때 |
|
Focus |
Control |
Control에 focus가 왔거나 사라졌을 때 |
|
Help |
Control, Menu, MenuItem |
F1 key 등을 눌러서 도움을 요청했을 때 |
|
Key |
Control |
키보드의 key가 눌렸거나 뗬을 때 |
|
Menu |
Menu |
Menu가 보여지거나 숨겨졌을 때 |
|
Modify |
Combo, Text |
Widget의 text가 변경됐을 때 |
|
Mouse |
Control |
Control에 마우스가 눌렸거나 떨어졌거나, 더블클릭 됐을 때 |
|
MouseMove |
Control |
Control 상에서 마우스가 움직였을 때 |
|
MouseTrack |
Control |
Control 상에 마우스가 들어왔거나 나갔을 때 |
|
Paint |
Control |
Control 이 다시 그려질 필요가 있을 때 |
|
Selection |
Button, Combo, CoolItem, List, MenuItem, Sash, Scale, ScrollBar, Slider, StyledText, TabFolder, Table, TableColumn, TableTree, Text, ToolItem, Tree |
Control의 item이 선택됐을 때 |
|
Shell |
Shell |
Shell이 최대화,최소화,활성화,비활성화, 또는 닫혔을 때 |
|
Traverse |
Control |
Control이 tab 됐을 때 |
|
Tree |
Tree, TableTree |
Tree item이 펼쳐지거나 닫혔을 때 |
|
Verify |
Text, StyledText |
Widget의 text가 막 변경되기 시작했을 때 |
Button 들도 style bit을 이용해서 각각 다른 모양으로 구성될 수 있다.
|
SWT.ARROW |
|
SWT.DOWN, SWT.UP, SWT.LEFT, SWT.RIGHT 등의 style bit 과 함께 사용하면 왼쪽과 같은 버튼을 만들 수도 있다. |
|
SWT.CHECK |
|
Checkbox 형 버튼 |
|
SWT.PUSH |
|
Push 버튼 |
|
SWT.RADIO |
|
Radio 형 버튼 |
|
SWT.TOGGLE |
|
Toggle 버튼 |
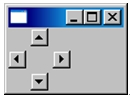


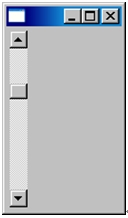
Slider, Scale, ProgressBar widget 들도 있다.
먼저, Scale은 선택가능한 값의 범위를 나타내며, Scale class의 setMinimum(), setMaximum() 메소드를 이용해 설정할 수 있고, getSelection() 메소드를 이용해서 선택된 값을 확인할 수 있다.
생성자에 전달되는 변수를 통해 다양한 scale, slider widget 을 생성할 수 있다.
아래 예제를 실행하면 다음과 같은 결과를 확인할 수 있다.
import org.eclipse.swt.SWT;
import org.eclipse.swt.events.SelectionEvent;
import org.eclipse.swt.layout.RowLayout;
import org.eclipse.swt.widgets.Display;
import org.eclipse.swt.widgets.Shell;
import org.eclipse.swt.widgets.Slider;
public class SliderExample {
public static void main(String[] args) {
Display display = new Display();
Shell shell = new Shell(display);
shell.setLayout( new RowLayout());
final Slider slider = new Slider(shell, SWT.VERTICAL);
slider.setMinimum(0);
slider.setMaximum(100);
slider.setIncrement(5);
slider.setPageIncrement(10);
slider.setSelection(25);
slider.addSelectionListener(
new SelectionAdaper() {
public void widgetSelected(SelectionEvent e) {
System.out.println("Selection : " + slider.getSelection());
}
}
);
shell.pack();
shell.open();
while( !shell.isDisposed() ) {
if( !display.readAndDispatch() ) display.sleep();
}
display.dispose();
}
}
Text , List , Sash widget은 아래와 같이 사용할 수 있다.
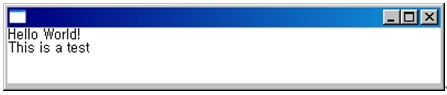
Text widget은 text를 편집할 수 있도록 해주며, StyledText widget을 이용해서 배경색, 전경색등을 설정할 수도 있으며, 기본적으로 아래의 style bit 을 이용해서 구성할 수 있다.
|
SWT.MULTI SWT.SINGLE |
편집창의 줄 수를 한 줄 또는 여러 줄로 보여줄 수 있도록 한다. |
|
SWT.READ_ONLY |
읽기 전용으로 설정할 수 있다 |
|
SWT.WRAP |
편집창의 끝에서 단어 단위로 개행하도록 설정한다. |
Text helloText = new Text(shell, SWT.LEFT | SWT.MULTI);
helloText.setText("Hello World! \nThis is a test");
helloText.setSize(400, 200);
위 소스를 실행하면 아래와 같은 결과를 얻을 수 있다.
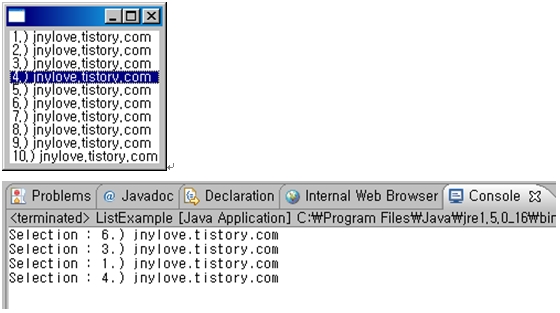
List widget은 선택 목록을 표시할 때 사용한다. Listener를 구현해서 목록에서 선택할 때의 event를 처리할 수 있다.
|
SWT.SINGLE |
선택 목록에서 하나만 선택하도록 한다. |
|
SWT.MULTI |
선택 목록에서 여러 개를 선택하도록 한다. |
|
SWT.H_SCROLL |
선택 목록에서 가로 스크롤바를 생성한다. |
|
SWT.V_SCROLL |
선택 목록에서 세로 스크롤바를 생성한다. |
final List list = new List(shell, SWT.MULTI);
for(int i = 1; i < 11 ; i++ )
list.add(i+ ".) jnylove.tistory.com");
list.addSelectionListener(
new SelectionAdaper() {
public void widgetSelected(SelectionEvent e) {
List list = (List)e.getSource();
String[] str = list.getSelection();
for( int i = 0; i < str.length ; i++ ) {
System.out.println("Selection : " + str[i]);
}
}
}
);
위 소스를 실행하면 아래와 같은 결과를 얻을 수 있다.
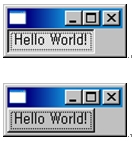
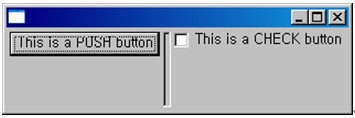
Sash widget은 composite widget들을 각각 크기 조절이 가능한 구역에 배치할 때 사용한다.
Button button = new Button(shell,SWT.PUSH);
button.setText("This is a PUSH button");
Sash sash = new Sash(shell, SWT.VERTICAL | SWT.BORDER);
Button button1 = new Button(shell,SWT.CHECK);
button1.setText("This is a CHECK button");
위 예제를 실행하면 아래와 같은 결과를 확인할 수 있다.
이제 Composite widget에 대해서 살펴보도록 한다.
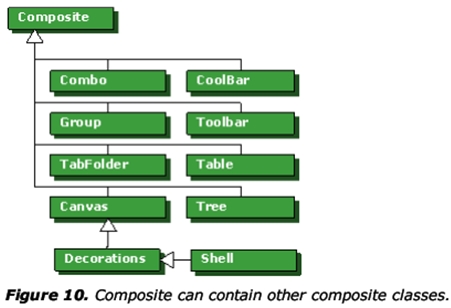
Composite class들은 다른 composite class들을 포함할 수 있다. Swing 에서의 add() method는 없지만, Composite widget class의 생성자를 통해서 사용할 수 있다.
위 그림에서 보는바와 같이 Shell 클래스도 Composite 클래스이다. 즉, Shell 클래스는 다른 composite class들을 포함할 수 있다는 말이다.
Composite widget 들은 SWT.H_SCROLL, SWT.V_SCROLL style bit 을 이용해서 scrollbar를 추가할 수 있다.
Table Widget은 String/Image 들을 표시할 수 있는데, 다른 composite widget 들과는 다르게 table widget에는 composite control들을 추가할 수 없으며, Table widget의 하위 컴포넌트는 TableItem 유형이어야 한다.
Table widget에서 사용할 수 있는 style bit는 아래와 같다.
|
SWT.MULTI SWT.SINGLE |
한 줄 또는 여러줄 선택을 가능토록 한다. |
|
SWT.FULL_SELECTION |
전체 행을 선택할 수 있도록 한다. |
|
SWT.CHECK |
각 행의 앞에 checkbox를 표시한다. |
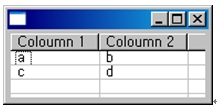
아래 코드를 실행하면 위 그림과 같은 결과를 확인할 수 있다.
Table table = new Table(shell,SWT.SINGLE);
TableColumn col1 = new TableColumn(table,SWT.LEFT);
col1.setText("Coloumn 1");
col1.setWidth(80);
TableColumn col2 = new TableColumn(table,SWT.LEFT);
col2.setText("Coloumn 2");
col2.setWidth(80);
TableItem item1 = new TableItem(table,0);
item1.setText(new String[]{"a","b"});
TableItem item2 = new TableItem(table,0);
item2.setText(new String[]{"c","d"});
table.setHeaderVisible(true);
table.setLinesVisible(true);
Combo widget은 목록에서 특정 값을 선택하거나, 다른 값을 입력할 수 있도록 할 수 있다.
Combo widget이 composite widget 이긴 하지만, String 이외에는 child element로 추가할 수 없다. add(String element) 메소드를 이용해서 추가할 수 있다.
다음 style bit을 Combo widget에서 사용할 수 있다.
|
SWT.DROP_DOWN |
드랍-다운 형태의 combo box |
|
SWT.READ_ONLY |
읽기 전용 combo box |
|
SWT.SIMPLE |
드랍-다운 목록이 아닌 간단한 combo box |
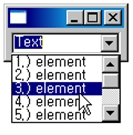
아래 코드를 실행하면 위 그림과 같은 결과를 확인할 수 있다.
Combo combo = new Combo(shell,SWT.DROP_DOWN);
for (int i = 1; i < 11; i++) {
combo.add(i+".) element ");
}
combo.setText("Text");
combo.addSelectionListener( new SelectionAdapter() {
public void widgetSelected(SelectionEvent e) {
System.out.println("Selection:"+ combo.getText());
}
} );
아래의 style bit 들을 Combo widget 에서 사용할 수 있다.
|
SWT.MULTI SWT.SINGLE |
한 줄 또는 여러줄 선택을 가능토록 한다. |
|
SWT.CHECK |
각 행의 앞에 checkbox를 표시한다. |
Tree widget은 tree 모양의 구조를 표현할 수 있다.
Tree 클래스가 비록 Composite class 이긴 하지만, sub item 으로 TreeItem 유형 말고는 추가할 수 없다.
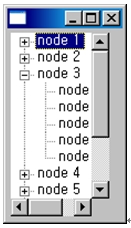
final Tree tree = new Tree(shell,SWT.SINGLE);
for (int i = 1; i < 11; i++) {
final TreeItem item1 = new TreeItem(tree,SWT.NULL);
item1.setText("node "+i);
for (int j = 1; j < 6; j++) {
final TreeItem item11 = new TreeItem(item1,SWT.NULL);
item11.setText("node "+i+"."+j);
}
}
tree.addSelectionListener( new SelectionAdapter() {
public void widgetSelected(SelectionEvent e) {
System.out.println("Selection:"+ tree.getSelection()[0]);
}
});
TabFolder widget은 page 단위로 화면을 표시할 수 있도록 한다.
TabFolder는 TabItem 유형의 widget만 추가할 수 있다.
각 tab의 내용은 setContent(Control control) method를 이용해서 설정할 수 있다.
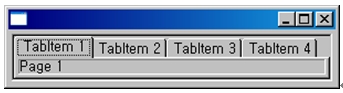
아래 소스를 실행하면 위 그림의 결과를 확인할 수 있다.
final TabFolder tabFolder = new TabFolder( shell, SWT.BORDER);
for (int i=1; i<5; i++){
// create a TabItem
TabItem item = new TabItem( tabFolder, SWT.NULL);
item.setText( "TabItem " + i);
// create a control
Label label = new Label( tabFolder, SWT.BORDER);
label.setText( "Page " + i);
// add a control to the TabItem
item.setControl( label );
}
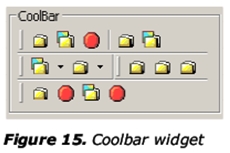
CoolBar widget은 동적으로 위치지정을 할 수 있는 영역을 제공한다.
CoolBar 에서 여러 개의 ToolBar widdget을 설정할 수 있고, CoolBar는 하나 이상의 CoolItem들을 포함할 수 있다. CoolBar의 sub item은 CoolItem 유형만 가능하다.
CoolBar coolBar = new CoolBar(shell, SWT.BORDER);
coolBar.setLayoutData( new FillLayout());
// create a tool bar which it
// the control of the coolItem
for (int k = 1; k <3; k++) {
ToolBar toolBar = new ToolBar(coolBar, SWT.FLAT);
for (int i = 1; i < 5; i++) {
ToolItem item = new ToolItem(toolBar, SWT.NULL);
item.setText("B"+k+"."+i);
}
// Add a coolItem to a coolBar
coolItem = new CoolItem(coolBar, SWT.NULL);
// set the control of the coolItem
coolItem.setControl(toolBar);
// You have to specify the size
Point size = toolBar.computeSize( SWT.DEFAULT, SWT.DEFAULT);
System.out.println("# 1 : " + size);
Point coolSize = coolItem.computeSize (size.x, size.y);
System.out.println("# 2 : " + coolSize);
coolItem.setSize(coolSize);
}
이상하게도 위 소스를 실행시켜봤으나 실제 결과를 확인할 수는 없었다. 그래서, 원본에 있던 이미지를 첨부한다.
여러가지 Composite widget 들에 대해서 설명을 했는데, 대부분의 Composite widget 들은 다른 composite 컴포넌트들을 하위 컴포넌트로 설정할 수 있었다. 하지만, 아래 표에 정리한 것처럼 몇몇 Composite widget 들은 item 들만 추가할 수 있었다.
|
Widget |
Item |
Description |
|
CoolBar |
CoolItem |
CoolBar 상에서 동적으로 위치 조정을 할 수 있는 구역들 |
|
Menu |
MenuItem |
Menu 하위의 선택할 수 있는 각 메뉴들 |
|
TabFolder |
TabItem |
TabFolder 에서 각 Tab들 |
|
Table |
TableItem TableColumn |
Table 에서 각 행들 |
|
ToolBar |
ToolItem |
Tool bar 에서의 버튼들 |
|
Tree |
TreeItem |
Tree 에서의 각 노드들 |
9. 결론
SWT는 Eclipse UI의 핵심이다. Eclipse platform 은 SWT library를 기반으로 하고 있다.
SWT 에 대한 공부를 더 해보고 싶은 사람은, SWT web site 에서 SWT 예제들을 다운로드 받아서 실행시켜보자.
Resources
Links
• A First Look at Eclipse Plug-In Programming, by Koray Guclu.
• Eclipse uses the Common Public License: http://www.eclipse.org/legal/cpl-v10.html
• Eclipse download site: http://www.eclipse.org/downloads/
• Articles published on the Eclipse Web site: http://www.eclipse.org/arcticles/
• Java download Web site: http://java.sun.com/downloads/index.html
• Eclipse user interface guidelines: http://www.eclipse.org/articles/Article-UI-Guidelines/Index.html
• Quality Eclipse: http://www.qualityeclipse.org/
• SWT Standard Widget Toolkit: http://www.eclipse.org/articles/Article-SWT-Design-1/SWT-Design-1.html
Books
• Eric Clayberg, Dan Rubel, 2004. Eclipse: Building Commercial-Quality Plug-Ins, Pearson Education; June 25, 2004.
• David Gallardo, Ed Burnett, Robert McGovern, 2003. Eclipse in Action: A Guide for Java Developers, Manning Publications.
• Sherry Shavor, Jim D'Anjou, Scott Fairbrother (2003) The Java Developer's Guide to Eclipse, Addison-Wesley Professional.
'그거 > Java' 카테고리의 다른 글
| log4j 사용해서 로깅하기 (0) | 2009.01.15 |
|---|---|
| [강추] JFace 예제 따라하기 (0) | 2008.12.15 |
| Tuning Garbage Collection with the 5.0 Java[tm] Virtual Machine (0) | 2008.10.31 |
| Performance Optimization on Solaris JVM (0) | 2008.10.31 |
| Ergonomics in the 5.0 Java[tm] Virtual Machine (0) | 2008.10.31 |

